By KaoShengChieh · Updated on Feb 24, 2021
In this tutorial, you’ll learn how to build a fancy coding environment with Microsoft’s cutting-edge products - WLS 2 (June 2019), Windows Terminal (May 2020) and VS Code (April 2016). Lastly, you will learn how to set up Docker Desktop.
Windows Subsystem for Linux
The Windows Subsystem for Linux (WSL) lets developers run a GNU/Linux environment – including most command-line tools, utilities, and applications – directly on Windows, unmodified, without the overhead of a traditional virtual machine or dual-boot setup.
WSL 2 is a new version of the WSL which introduces a significant architectural change as it is a full Linux kernel, allowing Linux containers to run natively without emulation. With Docker Desktop running on WSL 2, users can leverage Linux workspaces and avoid having to maintain both Linux and Windows build scripts.
1. Prepare the Windows Subsystem for Linux 2
-
Check your version and build number.
Press
Windows logo key+rand enter winver.x64 ARM64 Version 1903+ 2004+ Build 18362+ 19041+ Note: If you’re not sure what kind of machine you have, check “System Type” under System Information of your machine.
Lower versions and builds do not support WSL 2. Update your version if requirements not met.
-
Enable WSL and Virtual Machine Platform features
Open PowerShell as Administrator and run:
> dism.exe /online /enable-feature /featurename:Microsoft-Windows-Subsystem-Linux /all /norestart
> dism.exe /online /enable-feature /featurename:VirtualMachinePlatform /all /norestart
Restart your machine.
-
Install Linux kernel package.
x64 ARM64 x64 package ARM64 package Download and install the Linux kernel update package.
-
Set WSL 2 as your default version
Open PowerShell and run:
> wsl --set-default-version 2
2. Install your Linux Distribution
Open the Microsoft Store and select your preferred Linux distribution. Note that you should choose one of those supported by Docker.

The first time you launch a newly installed Linux distribution, a console window will open and you’ll be asked to wait for a minute for files to de-compress and be stored on your PC.
You will then need to create a user account and password for your new Linux distribution.
3. Check Default Settings
Ensure the distribution runs in WSL 2 mode. Open PowerShell and run:
> wsl.exe -l -v
-
If your Linux distro is version 1, upgrade it to version 2 by running:
> wsl.exe --set-version <distro name> 2 -
If your Linux distro is not default WSL (doesn’t have a star sign
*on the left of<distro name>), set it as default one by running:> wsl --set-default <distro name>
Windows Terminal
The Windows Terminal is a modern, fast, efficient, powerful, and productive terminal application for users of command-line tools and shells like Command Prompt, PowerShell, and WSL. Its main features include multiple tabs, panes, Unicode and UTF-8 character support, a GPU accelerated text rendering engine, and custom themes, styles, and configurations.
1. Install Windows Terminal
Open the Microsoft Store and install Windows Terminal.

Windows Terminal’s AD on YouTube (44 sec)
I strongly recommend you pin Windows Terminal on your taskbar or create a desktop shortcut.

2. Set WSL as Default Tab
Launch Windows Terminal and open settings. You can edit settings with Notepad or other editors.
{
  //...,
  "defaultProfile": [guid_of_your_powershell],
  //...,
  "profiles":
  {
    //...,
    "list":
    [
      //...,
      {
        "guid": [guid_of_your_wsl],
        "hidden": false,
        "name": [name_of_your_wsl],
        "source": [source_of_your_wsl]
      },
      //...
    ]
  },
  //...
}
Change value of defaultProfile and add attribute commandline.
{
  //...,
  "defaultProfile": [guid_of_your_wsl],
  //...,
  "profiles":
  {
    //...,
    "list":
    [
      //...,
      {
        "guid": [guid_of_your_wsl],
        "hidden": false,
        "name": [name_of_your_wsl],
        "commandline": "wsl.exe ~",
        "source": [source_of_your_wsl]
      },
      //...
    ]
  },
  //...
}
3. Try Splitting Panes for Multiple Shells
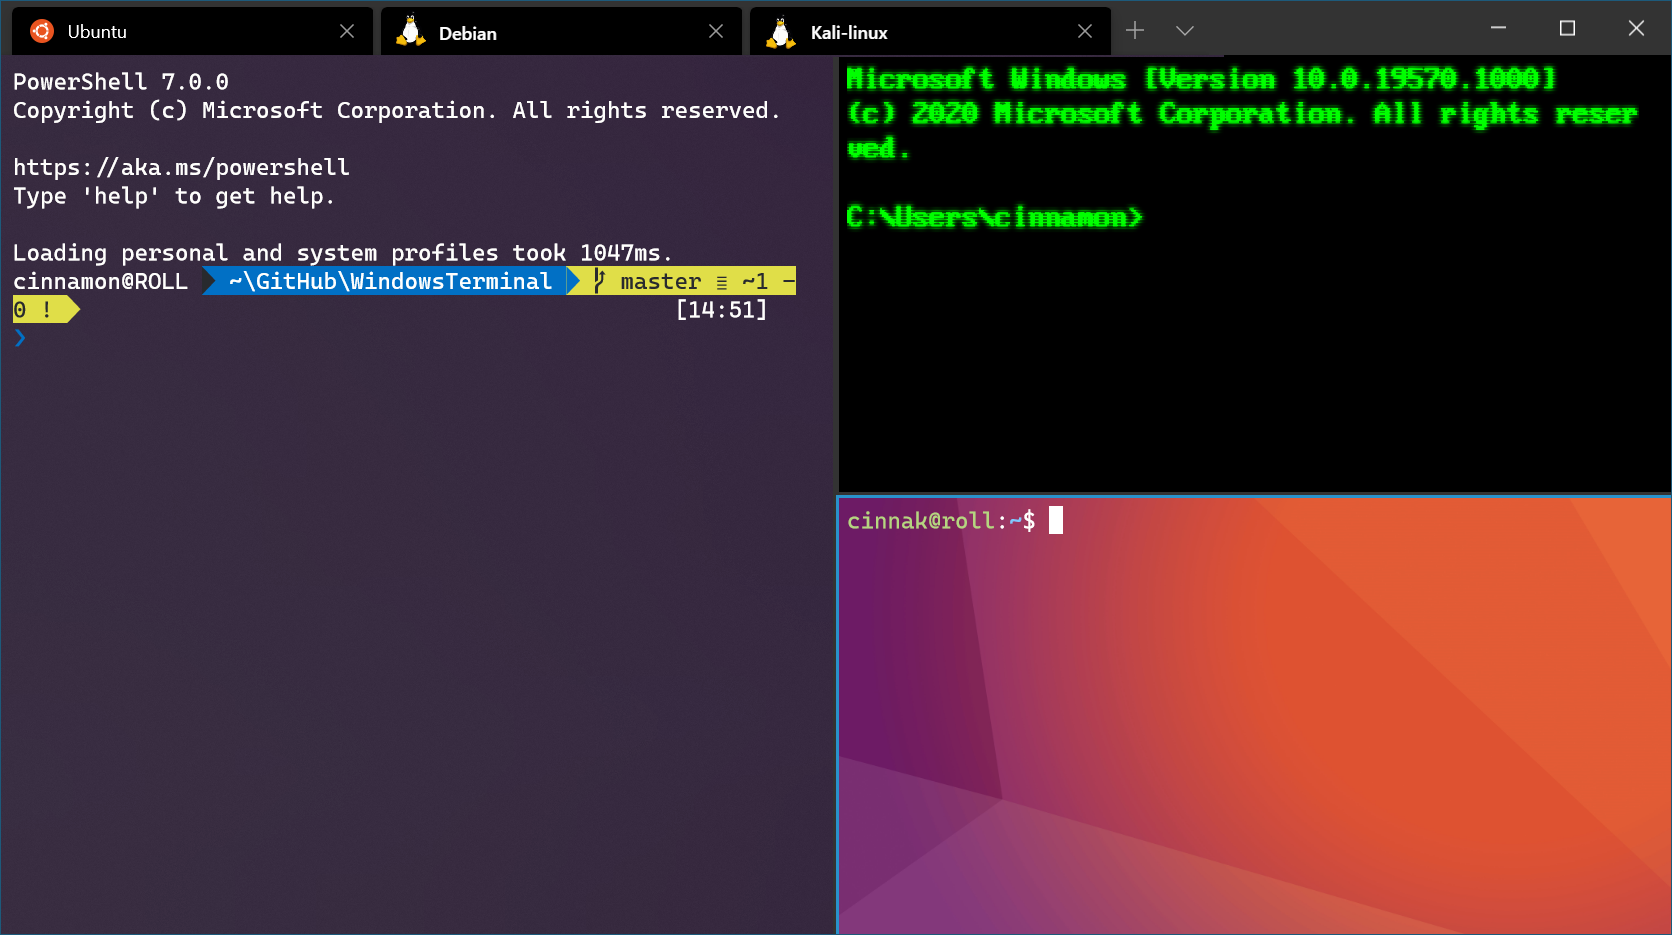
Here are some other keyboard shortcuts for working with panes:
- Create a new pane, splitting horizontally:
Alt+Shift+- - Create a new pane, splitting vertically:
Alt+Shift++ - Move pane focus:
Alt+Left,Alt+Right,Alt+Down,Alt+Up - Resize the focused pane:
Alt+Shift+Left,Alt+Shift+Right,Alt+Shift+Down,Alt+Shift+Up - Close a pane:
Ctrl+Shift+w
These are the default hotkeys, and you can change them if you like.
Note: When new tab or new pane created, it should be WSL instead of PowerShell if you do last step correctly.
Visual Studio Code
Visual Studio Code (VS Code) is a lightweight but powerful source code editor made by Microsoft. It comes with built-in support for JavaScript, TypeScript and Node.js and has a rich ecosystem of extensions for other languages (such as C++, C#, Java, Python, PHP, Go) and runtimes (such as .NET and Unity).

1. Install VS Code
Download and install VS Code. Restart machine.
The first time you launch VS Code, it may suggest you install some extensions. Install all of them.
You can customize user interface or do it later.
VS Code also has some powerful functionality such as:
- Source control management including Git support - you can review diffs, stage files, and make commits right from the editor.
- Docker extension to make it easy to build, manage, and deploy containerized applications.
I merely leave the information here and won’t spend words on elaborating them. You can try them when you become experienced users.
2. Install WSL Extension
WSL extension runs commands and other extensions directly in WSL so you can edit files located in WSL or the mounted Windows filesystem (for example /mnt/c) without worrying about pathing issues, binary compatibility, or other cross-OS challenges.
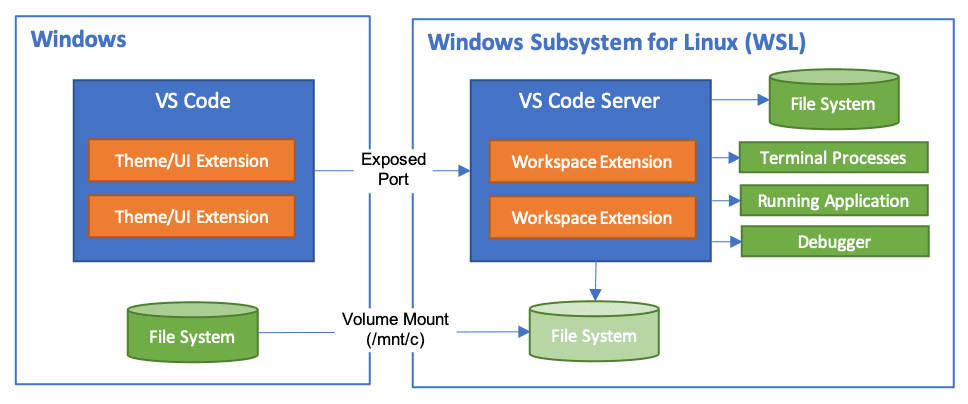
This lets VS Code provide a local-quality development experience — including full IntelliSense (completions), code navigation, and debugging — regardless of where your code is hosted.
To launch VS Code, simply open Windows Terminal and type:
$ code .
When doing this for the first time, you should see VS Code fetching components needed to run in WSL.
Note: If the command does not work, you might have failed to set WSL as Windows Terminal’s default tab or not restarted your machine yet.
After a moment, a new VS Code window will appear, and you’ll see a notification that VS Code is opening the folder in WSL.

VS Code will now continue to configure itself in WSL and keep you up to date as it makes progress.
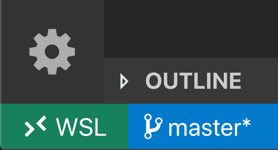
Once finished, you now see a WSL indicator in the bottom left corner.
CONGRATULATIONS! You’ve successfully set up a perfect coding environment which integrates WSL, Windows Terminal and VS Code with your Windows 10!
So far, we have built a seamless mixed Windows and Linux OS. It is useful for your projects and your future software engineer life. Wait, what did I mean “seamless”?
You can run Linux command in Windows file system:
// Under Windows file system, use Linux command "find" to
// list all files with ".c" extension under current directory.
$ find . -name "*.c" -type f
You can run Windows application in WSL file system:
// Under WSL file system, use Windows application "File Explorer"
// to view current directory with graphical user interface.
$ explorer.exe .
Last but not least, only one easiest step remains.
Docker Desktop
Docker Desktop uses the dynamic memory allocation feature in WSL 2 to greatly improve the resource consumption. This means, Docker Desktop only uses the required amount of CPU and memory resources it needs, while enabling CPU and memory-intensive tasks such as building a container to run much faster. In addition, WSL 2 provides improvements to file system sharing, boot time, and allows access to some cool new features for Docker Desktop users.
Install Docker Desktop
Download and install Docker Desktop.
Note: Ensure you have completed the steps described in previous sections before installing Docker Desktop.
Follow the usual installation instructions.
Enable WSL for Docker
Launch Docker Desktop. From the Docker menu, select Settings > General. If you have completed the steps described in previous sections, the option Use WSL 2 based engine should be enabled by default.

Select Resources > WSL Integration. WSL Integration will be enabled on your default Linux distribution of WSL. If not, enable your distributions and click Apply & Restart.
That’s it! Once you restart the machine, you can run this command to tell everything is well done:
$ docker run hello-world
Of course, you should run this Docker command in Windows Terminal with WLS 2.
Documentation
- Windows Subsystem for Linux
https://docs.microsoft.com/en-us/windows/wsl/ - Windows Terminal
https://docs.microsoft.com/en-us/windows/terminal/ - Visual Studio Code
https://code.visualstudio.com/docs - Docker Desktop for Windows
https://docs.docker.com/docker-for-windows/